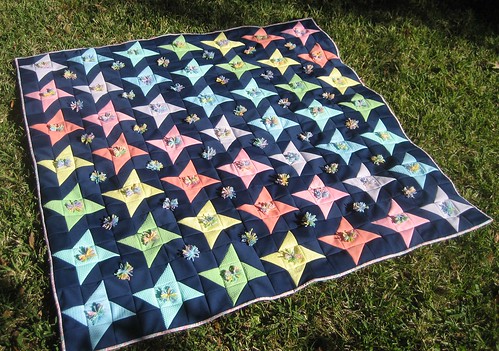
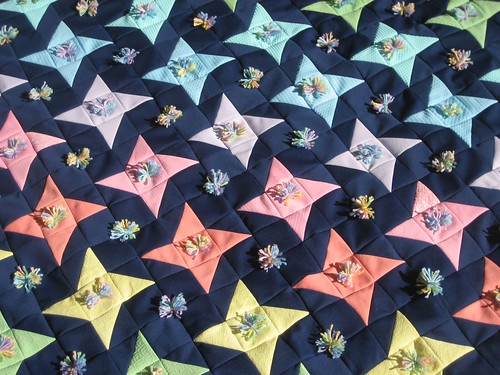
This quilt has been a *very* long time coming.
I began it in the early 1990s, not long after my maternal Grandmother moved out of her house & into nursing care. As the families emptied her house, all of Grandma's fabric came to me. I was just then rekindling my love of sewing & patchwork, so my Mom suggested that I make a quilt for Grandma -- which I quickly did. A cute little throw-sized quilt using some of my new-to-me feed sacks & old solids.
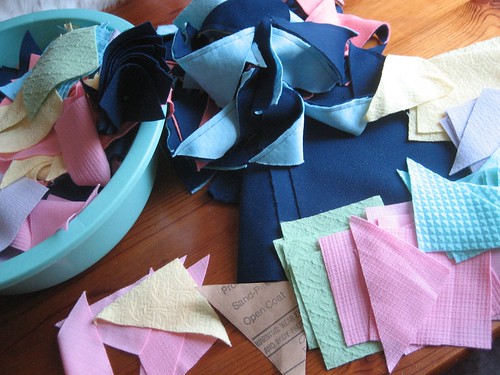
But Mom said it was too "good" & might be stolen -- so, I began another quilt using polyester double knit scraps & yardage. Unfortunately, this was at the same time that Shug & I were planning our wedding, I was packing to move to Texas &, well, the quilt didn't get made. I put the pieces in a wash basin, stowed them in my parents' basement & there they sat for 20 years.
Forward to 2011, when I re-found the basin. By now, those kind of creepy double knits had acquired the Glow of Nostalgia. I began piecing together the parts in the summer of 2011, finished the top in October, then it sat for another couple of years.
This summer, I got Roderick Kiracofe's Blurb book, Quilts & saw in it a charming double knit charm quilt tied with little polka dot-like pompoms. I loved it! I finally knew how I wanted to finish my quilt!
I had begun referring to this project as Sunday School Stars because so many of the fabrics had been or were going to be simple A-line dresses for one or the other of my Grandmas or my Mom -- all good Church Ladies. But the addition of the pompoms (or scrawny pompom-oids, you pick) has kind of taken it in a different direction. I loved the top, but I REALLY love the finished quilt! It brings giggling smiles to my face when I look at it!
So maybe Sunday School Stars: Joy Joy Joy?
Saturday, November 30, 2013
Monday, November 25, 2013
FYI
If you are thinking about making a quilt & that quilt will be made up of 2-inch finished squares & you want that quilt to be fair-sized, not huge, just big enough to be a lap or nap size, please learn from my recent experience:
It will take you FOR! EVER!!!
(The color change you see is not a trick of your eye -- I ran out of my old Kona celery part way through & the new is a slightly different color. I'm hoping I can hide it a bit with the quilting. Fingers crossed!)
It will take you FOR! EVER!!!
(The color change you see is not a trick of your eye -- I ran out of my old Kona celery part way through & the new is a slightly different color. I'm hoping I can hide it a bit with the quilting. Fingers crossed!)
Sunday, November 10, 2013
A Tutorial & a Tribute
I've always wanted to attempt a Tutorial. The fear of the unknown kept me from it. But recently, the amazing & adorable Jennie at Clover & Violet -- she has the mini I made in the Fab Little Quilt Swap -- told me that she gets questions & comments about that mini (you can see it in photos of her studio, hanging on the wall) & asked if I'd ever thought of doing a tutorial. That's just the encouragement I needed! So here goes!
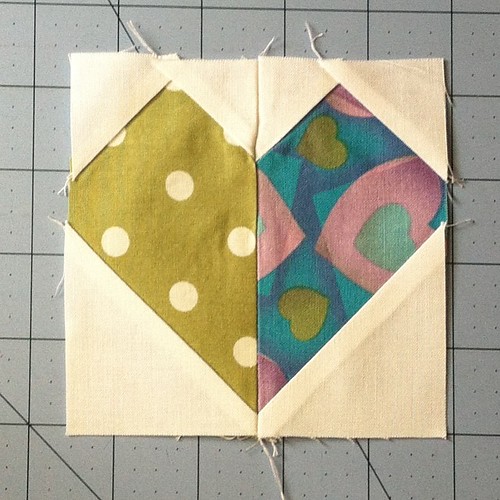
The hearts in Jennie's mini are 4 inches finished. To make one heart, you will need:
2 -- 2.5 x 4.5 inch rectangles, these will be your heart
4 -- 1.5 inch squares of your background
2 -- 2.5 inch squares of your background
First, mark a diagonal line on all of the squares -- these will be your sewing lines. Use your favorite method: score with a hera tool, use a disappearing pen or pencil or a sharp, non-disappearing pencil. Me, I iron the squares in half diagonally.
Next, place one of the small squares on the rectangle so the corners line up. You can pin them in place, use a dab of glue stick, or in the case of these tiny hearts, just hold them in place & sew along the marked diagonal. Once stitched in place, snip away the underneath corners. Now sew the other small square on the other side of the rectangle & snip off the corners.
For the bottom of the heart, take one of the larger squares, line up the corners & sew it in place. When you sew your second bottom square, make sure that the diagonal sewing line is in the opposite direction of the first, so you will have a V at the bottom of your finished heart. Snip away the underneath corners & give the rectangles a good press.
Then, sew your 2 rectangles together. I like to press the seams open, especially with a block this small, I find it helps to reduce bulk.
The fun thing about this method is you can make these hearts any size you want. What you need to remember is:
1. Your rectangles need to sew together to make a square.
2. Determining the size of the 4 top squares is just slightly tricky. Think of the top of the heart as a flying geese block. If the finished width of the block is x (in our example, x = 2), then the height of the block will be x/2 (for our 4 inch block, 2/2 = 1). Be sure to add seam allowances, so the final equation (I promise) is x/2 + 0.5 = the size of the 4 squares for the top of the heart.
3. Your larger, bottom-of-the-heart squares are the same width as the short side of the rectangle.
With these tools in your belt, not only can you make hearts blocks any size you want, you can make rectangular hearts, hearts with different sized sides, even wonky hearts.
I learned the basics of this method from one of my earliest quilt books. Mary Ellen Hopkins had the Modern Quilt esthetic before many of the Modern Quilters were born. She didn't teach patterns, she didn't give yardage requirements or cutting instructions; she taught the Tools that helped quilters to make the quilts in their heads. Quick, easy construction methods, setting ideas that could take a quilt from ordinary to WOW, the permission to not worry about 'perfection', to combine lots of colors & patterns that don't 'go' together -- to just have fun. She wanted quilters to make quilts that would be used & loved -- evidence, the title of one of her most famous books: The It's OK if You Sit on My Quilt Book. She was a spitfire.
You'll notice I've been referring to her in the past tense. When I began thinking about this post & the seeds she planted in me that led to the little quilt I made for Jennie, I did an Internet search of her name & learned that she had passed away. I wasn't too surprised; I knew she must be quite elderly by now. She had just passed on the 11th of July. It made me sad. But what an amazing legacy she left, not just to her family & loved ones but also to the Quilt World.
If her name is new to you, go to the library, go to a used bookstore & search out her titles. You will be glad you did, you will be a better quilter for it.
Saturday, November 02, 2013
What would Libby do?
Libby Lehman is who I want to be when I grow up.
She is many things: quilter, artist, writer, teacher, mentor, judge, lecturer. And all done with style & grace. She is everything I wish I could be: strong, smart, talented, funny & generous. A "Lady" in the old sense of the word.
I'm pretty sure I first saw one of her quilts at my very first Quilt Festival back in 1991. I think it was a smallish piece with simple patchwork, vivid colors & amazing machine-embellished thread 'ribbons' winding through the piece. That's the hallmark of her work: saturated colors & domestic machine mastery. Her quilts are distinctive & beautiful. Her "Joy Ride" was among the 100 Best American Quilts of the 20th Century; she has quilts in private, corporate & museum collections.
But she has been lain low -- a brain aneurism, followed by a stroke, followed by a severe infection. Her Caring Bridge sight is a heart-breaking document of the highs & lows her family & friends have experienced since late April of this year. They remain optimistic about her recovery, though realistic that the road will be a long & difficult one for Libby.
At this year's Quilt Festival, there is a special exhibit of 37 of her quilts spanning 30 years. Even the early ones are distinctly "Libby". It was delightful to see her change & grow as an artist over the years.
I hope that she will continue to add to this body of work in the future.
Joy Ride (detail) 1996
She is many things: quilter, artist, writer, teacher, mentor, judge, lecturer. And all done with style & grace. She is everything I wish I could be: strong, smart, talented, funny & generous. A "Lady" in the old sense of the word.
I'm pretty sure I first saw one of her quilts at my very first Quilt Festival back in 1991. I think it was a smallish piece with simple patchwork, vivid colors & amazing machine-embellished thread 'ribbons' winding through the piece. That's the hallmark of her work: saturated colors & domestic machine mastery. Her quilts are distinctive & beautiful. Her "Joy Ride" was among the 100 Best American Quilts of the 20th Century; she has quilts in private, corporate & museum collections.
But she has been lain low -- a brain aneurism, followed by a stroke, followed by a severe infection. Her Caring Bridge sight is a heart-breaking document of the highs & lows her family & friends have experienced since late April of this year. They remain optimistic about her recovery, though realistic that the road will be a long & difficult one for Libby.
At this year's Quilt Festival, there is a special exhibit of 37 of her quilts spanning 30 years. Even the early ones are distinctly "Libby". It was delightful to see her change & grow as an artist over the years.
Red Sky at Morning 1982
New Mexico Suites: Native Son (detail) 1984
Captive Color 1989
You're Invited 1990
Flotsam (detail) 1995
Silent Partners 1995
Squares Inside of Squares 1999
Drift IV 2002
High Hopes 2012
Watch Your Step: Fall 2012
I hope that she will continue to add to this body of work in the future.
Subscribe to:
Posts (Atom)