
The hearts in Jennie's mini are 4 inches finished. To make one heart, you will need:
2 -- 2.5 x 4.5 inch rectangles, these will be your heart
4 -- 1.5 inch squares of your background
2 -- 2.5 inch squares of your background

First, mark a diagonal line on all of the squares -- these will be your sewing lines. Use your favorite method: score with a hera tool, use a disappearing pen or pencil or a sharp, non-disappearing pencil. Me, I iron the squares in half diagonally.

Next, place one of the small squares on the rectangle so the corners line up. You can pin them in place, use a dab of glue stick, or in the case of these tiny hearts, just hold them in place & sew along the marked diagonal. Once stitched in place, snip away the underneath corners. Now sew the other small square on the other side of the rectangle & snip off the corners.


For the bottom of the heart, take one of the larger squares, line up the corners & sew it in place. When you sew your second bottom square, make sure that the diagonal sewing line is in the opposite direction of the first, so you will have a V at the bottom of your finished heart. Snip away the underneath corners & give the rectangles a good press.


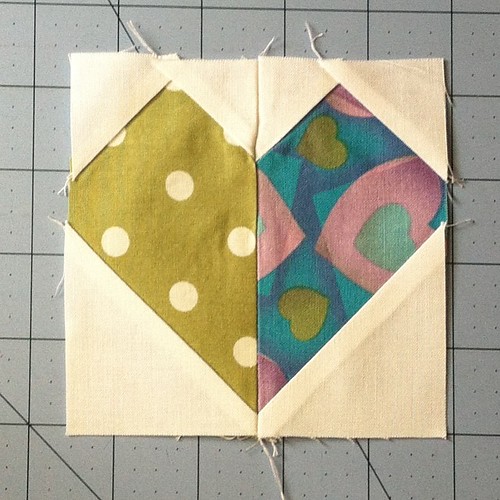
Then, sew your 2 rectangles together. I like to press the seams open, especially with a block this small, I find it helps to reduce bulk.


The fun thing about this method is you can make these hearts any size you want. What you need to remember is:
1. Your rectangles need to sew together to make a square.
2. Determining the size of the 4 top squares is just slightly tricky. Think of the top of the heart as a flying geese block. If the finished width of the block is x (in our example, x = 2), then the height of the block will be x/2 (for our 4 inch block, 2/2 = 1). Be sure to add seam allowances, so the final equation (I promise) is x/2 + 0.5 = the size of the 4 squares for the top of the heart.
3. Your larger, bottom-of-the-heart squares are the same width as the short side of the rectangle.
With these tools in your belt, not only can you make hearts blocks any size you want, you can make rectangular hearts, hearts with different sized sides, even wonky hearts.
I learned the basics of this method from one of my earliest quilt books. Mary Ellen Hopkins had the Modern Quilt esthetic before many of the Modern Quilters were born. She didn't teach patterns, she didn't give yardage requirements or cutting instructions; she taught the Tools that helped quilters to make the quilts in their heads. Quick, easy construction methods, setting ideas that could take a quilt from ordinary to WOW, the permission to not worry about 'perfection', to combine lots of colors & patterns that don't 'go' together -- to just have fun. She wanted quilters to make quilts that would be used & loved -- evidence, the title of one of her most famous books: The It's OK if You Sit on My Quilt Book. She was a spitfire.
You'll notice I've been referring to her in the past tense. When I began thinking about this post & the seeds she planted in me that led to the little quilt I made for Jennie, I did an Internet search of her name & learned that she had passed away. I wasn't too surprised; I knew she must be quite elderly by now. She had just passed on the 11th of July. It made me sad. But what an amazing legacy she left, not just to her family & loved ones but also to the Quilt World.
If her name is new to you, go to the library, go to a used bookstore & search out her titles. You will be glad you did, you will be a better quilter for it.
9 comments:
Thanks for the tutorial! I loved seeing your original heart blocks for the mini quilt.
Great tutorial! Thanks for the information on Mary Ellen Hopkins. I'm going to look her up right now.
love the tutorial. I remember the "It's OK if You Sit on My Quilt" book. I remember always thinking that's how I felt about quilts I gifted to people - wanting them to be loved and used, not stored safely away for preservation!
I heart your heart!! Thank you for the very clear and well explained tutorial. I'm going to look up Mary Ellen Hopkins, she sounds like my kind of quilter!
Lovely tutorial, thank you.
Thanks for sharing this! I have been wanting to make stitched valentine postcards for some people I know and love and this will be perfect!
I used your tutorial to make a mug mat. Thank you for sharing!
http://seaside-stitches.blogspot.com/2014/02/mini-valentine.html
Thank you for sharing this :-)
Post a Comment